1. What You Will Need Before You Start
Neo AI depends on three cloud services. All three offer free tiers — enough to get started. Set up these accounts first.
1.1 A GitHub Account
Why: GitHub stores your code and connects to Netlify so every update deploys automatically.
- Go to github.com and create a free account.
- No paid plan needed.
1.2 A Supabase Account
Why: Supabase provides your database (PostgreSQL), user authentication, file storage, and the vector database powering the AI knowledge base (RAG).
- Go to supabase.com and sign up for the Free Plan.
- You can run 2 projects on the free tier.
- No credit card required.
1.3 A Netlify Account
Why: Netlify hosts your live website. It handles builds, SSL certificates, and custom domains automatically.
- Go to netlify.com and sign up for the Free Plan.
- 300 credits/month where 15 credits per build — plenty for a growing agency.
- Sign up with your GitHub account for the smoothest setup.
1.4 An AI Provider API Key
Why: Neo AI generates proposals using AI. You need at least one API key from a supported provider.
| Provider | Free Tier? | Where to Get It |
|---|---|---|
| OpenAI | No (pay-as-you-go) | platform.openai.com/api-keys |
| Anthropic (Claude) | No (pay-as-you-go) | console.anthropic.com |
| Google (Gemini) | ✅ Free tier | aistudio.google.com |
| Groq | ✅ Generous free tier | console.groq.com/keys |
| OpenRouter | No (pay-as-you-go) | openrouter.ai/keys |
| DeepSeek | No (pay-as-you-go) | platform.deepseek.com |
| Local LLM | ✅ Free (100%) | LM Studio or Ollama on your machine |
Tip for beginners: Start with Groq — generous free tier, fast inference, and the easiest to set up.
2. Unzip the Files and Upload to GitHub
2.1 Extract the Files
- Locate the zip file you downloaded.
- Extract it to a folder on your computer. Name it something like
NeoAI(no spaces).
NeoAI/
├── smart-proposal-generator/    # Main application
├── DOCUMENTATION/
├──
├── LICENSE
├── README.md
└── ...
2.2 Create a New Repository on GitHub
- Log in to your GitHub account.
- Click the green "New" button (top-left), or go to github.com/new.
- Name your repository (e.g.
Neo AI). - Choose Public or Private — either works.
- Do NOT check "Add a README" or ".gitignore" — we already have those.
- Click Create repository.
Keep this page open — you will use the commands shown next.
2.3 Upload Your Code
Open Terminal (macOS) or Command Prompt / PowerShell (Windows).
# Navigate to the folder you extracted
cd ~/Downloads/Neo AI

# Initialize Git
git init
git branch -M main

# Add all files (respects .gitignore automatically)
git add .

# Commit
git commit -m "Initial commit: Neo AI"

# Connect to your GitHub repository
git remote add origin https://github.com/YOUR_USERNAME/YOUR_REPO.git

# Push to GitHub
git push -u origin mainReplaceYOUR_USERNAMEandYOUR_REPOwith your actual GitHub username and repository name.
2.4 Verify
Go to your GitHub repository page in the browser and refresh. You should see all the files listed. If you do, you are ready for the next step.
3. Configure Supabase
This is the most important step. We will set up the database, configure authentication, and prepare file storage.
3.1 Create a Supabase Project
- Log in to supabase.com.
- Click "New project".
- Fill in:
- Name: "Neo AI" (or anything you like)
- Database Password: Click "Generate a secure password" — save this somewhere safe (you will need it later).
- Region: Choose the one closest to your customers.
- Click "Create new project".
Supabase takes about 2-3 minutes to provision your database.
3.2 Find Your Supabase Credentials
Once the project is ready, open .env.example from the project directory. You need 4 credentials from Supabase:
# Database
DATABASE_URL=

# Supabase (Database & Storage)
NEXT_PUBLIC_SUPABASE_URL=
NEXT_PUBLIC_SUPABASE_ANON_KEY=
SUPABASE_SERVICE_ROLE_KEY=
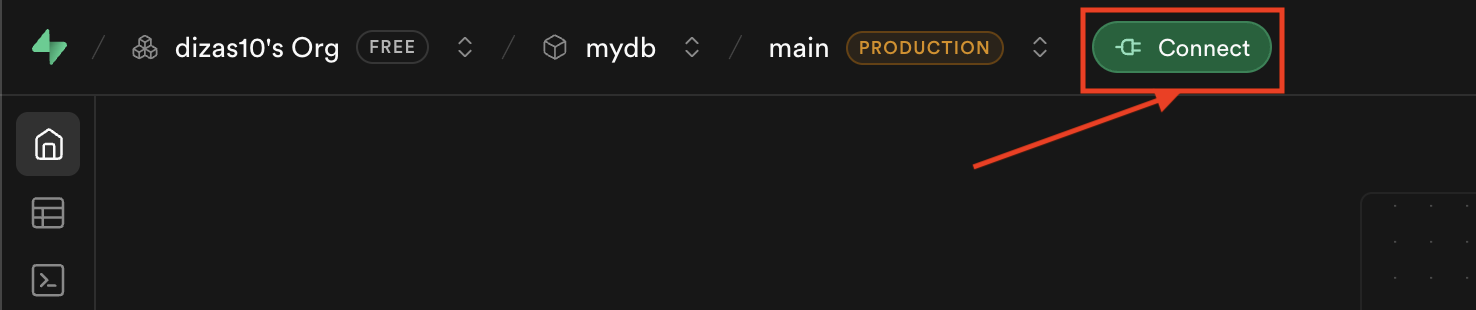
1. DATABASE_URL
Click Connect from your project top bar:
A dialog opens. Select Direct then Session Pooler. Scroll down, copy the Connection string and paste it beside DATABASE_URL. Replace [YOUR-PASSWORD] with the previously saved password (without brackets):
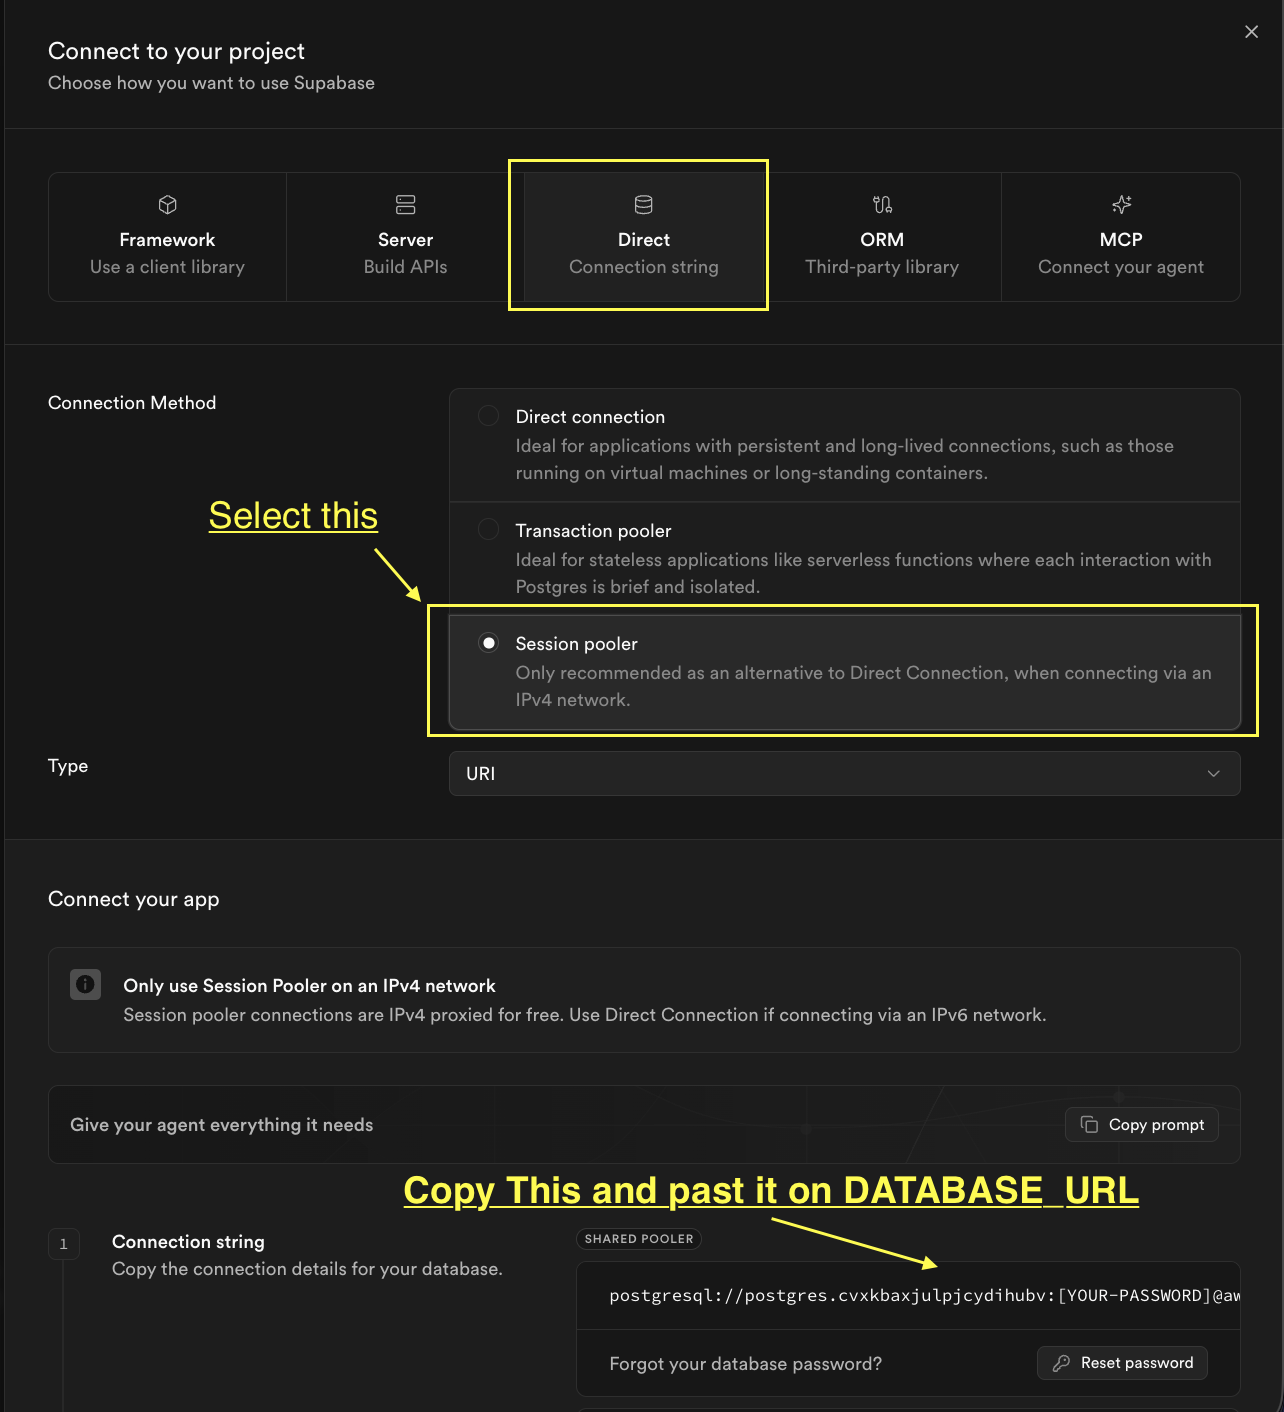
Note: If your password contains special characters (e.g. @, %), it needs to be URL-encoded before use. A quick ChatGPT or Gemini prompt can do that.
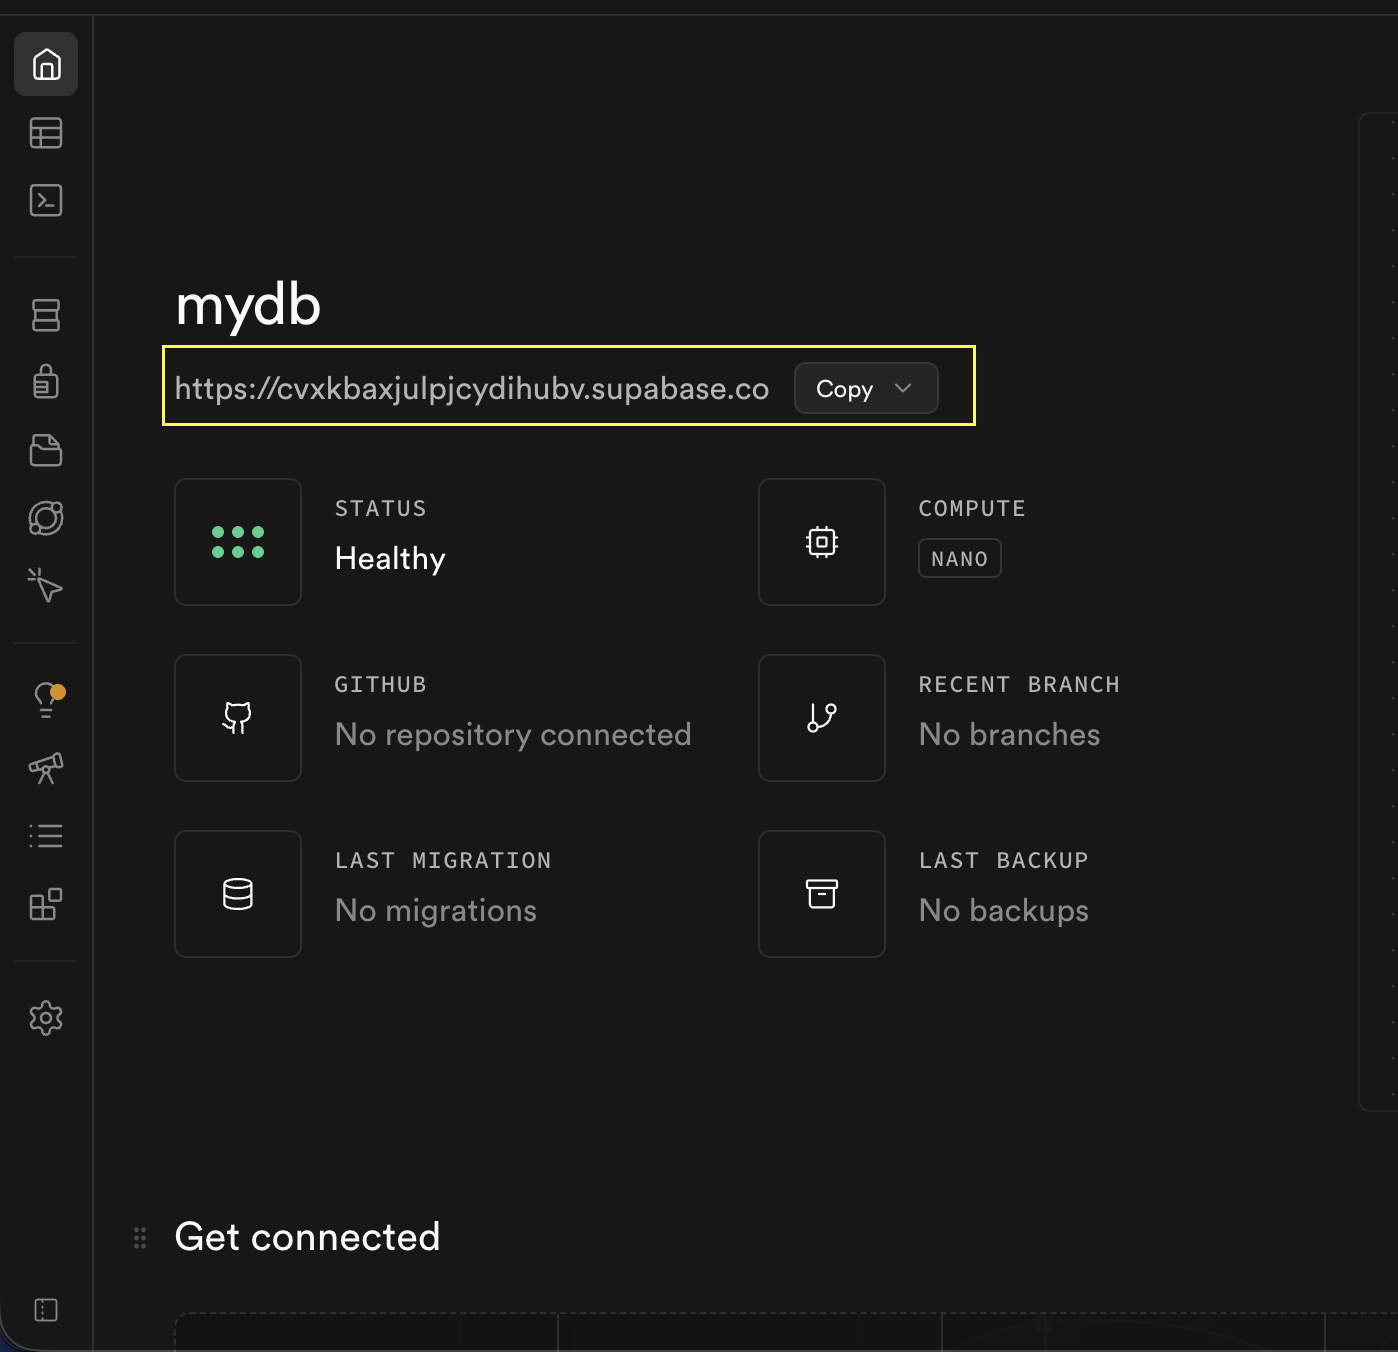
2. NEXT_PUBLIC_SUPABASE_URL
You will find this on the project homepage:
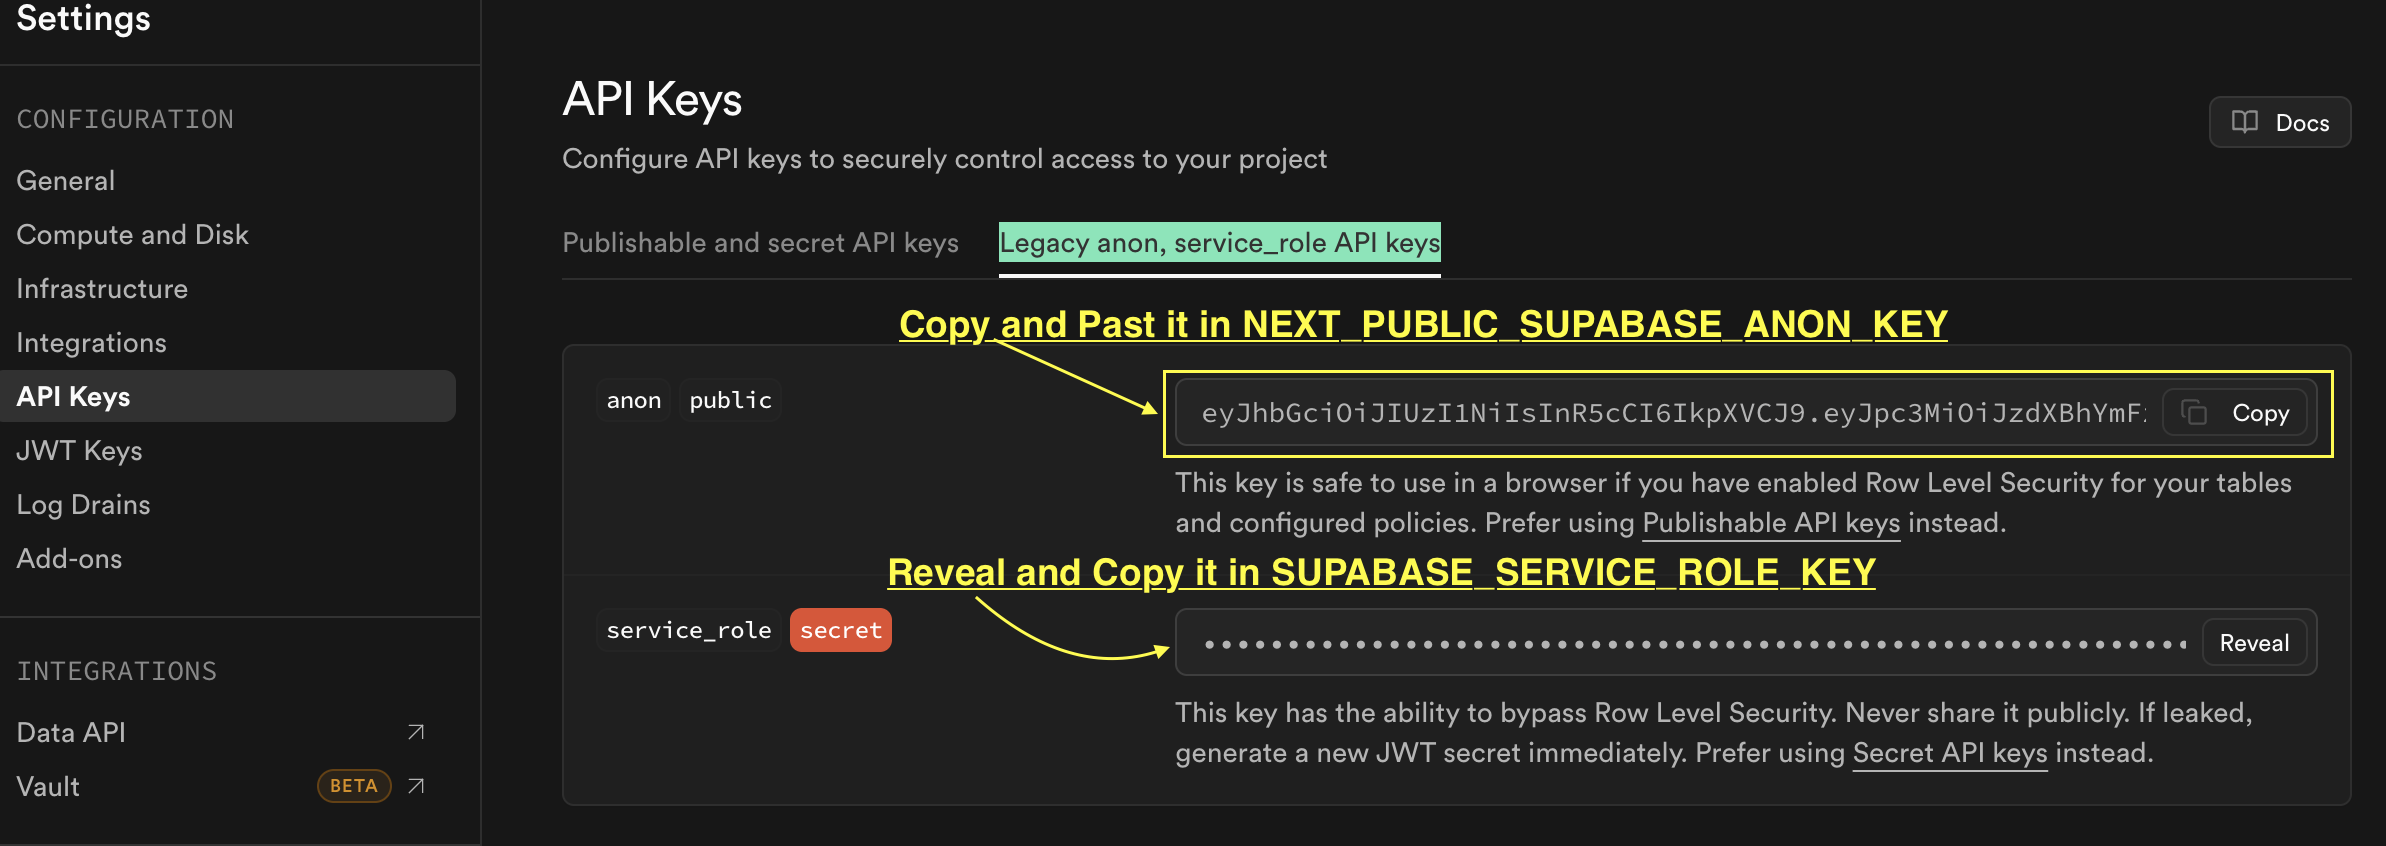
3. NEXT_PUBLIC_SUPABASE_ANON_KEY & SUPABASE_SERVICE_ROLE_KEY
Go to left sidebar Project Settings → API Keys → Legacy anon, service_role API keys:
3.3 Configure Authentication
- Go to Authentication → Sign In/Providers in Supabase.
- Disable "Confirm email" for now.
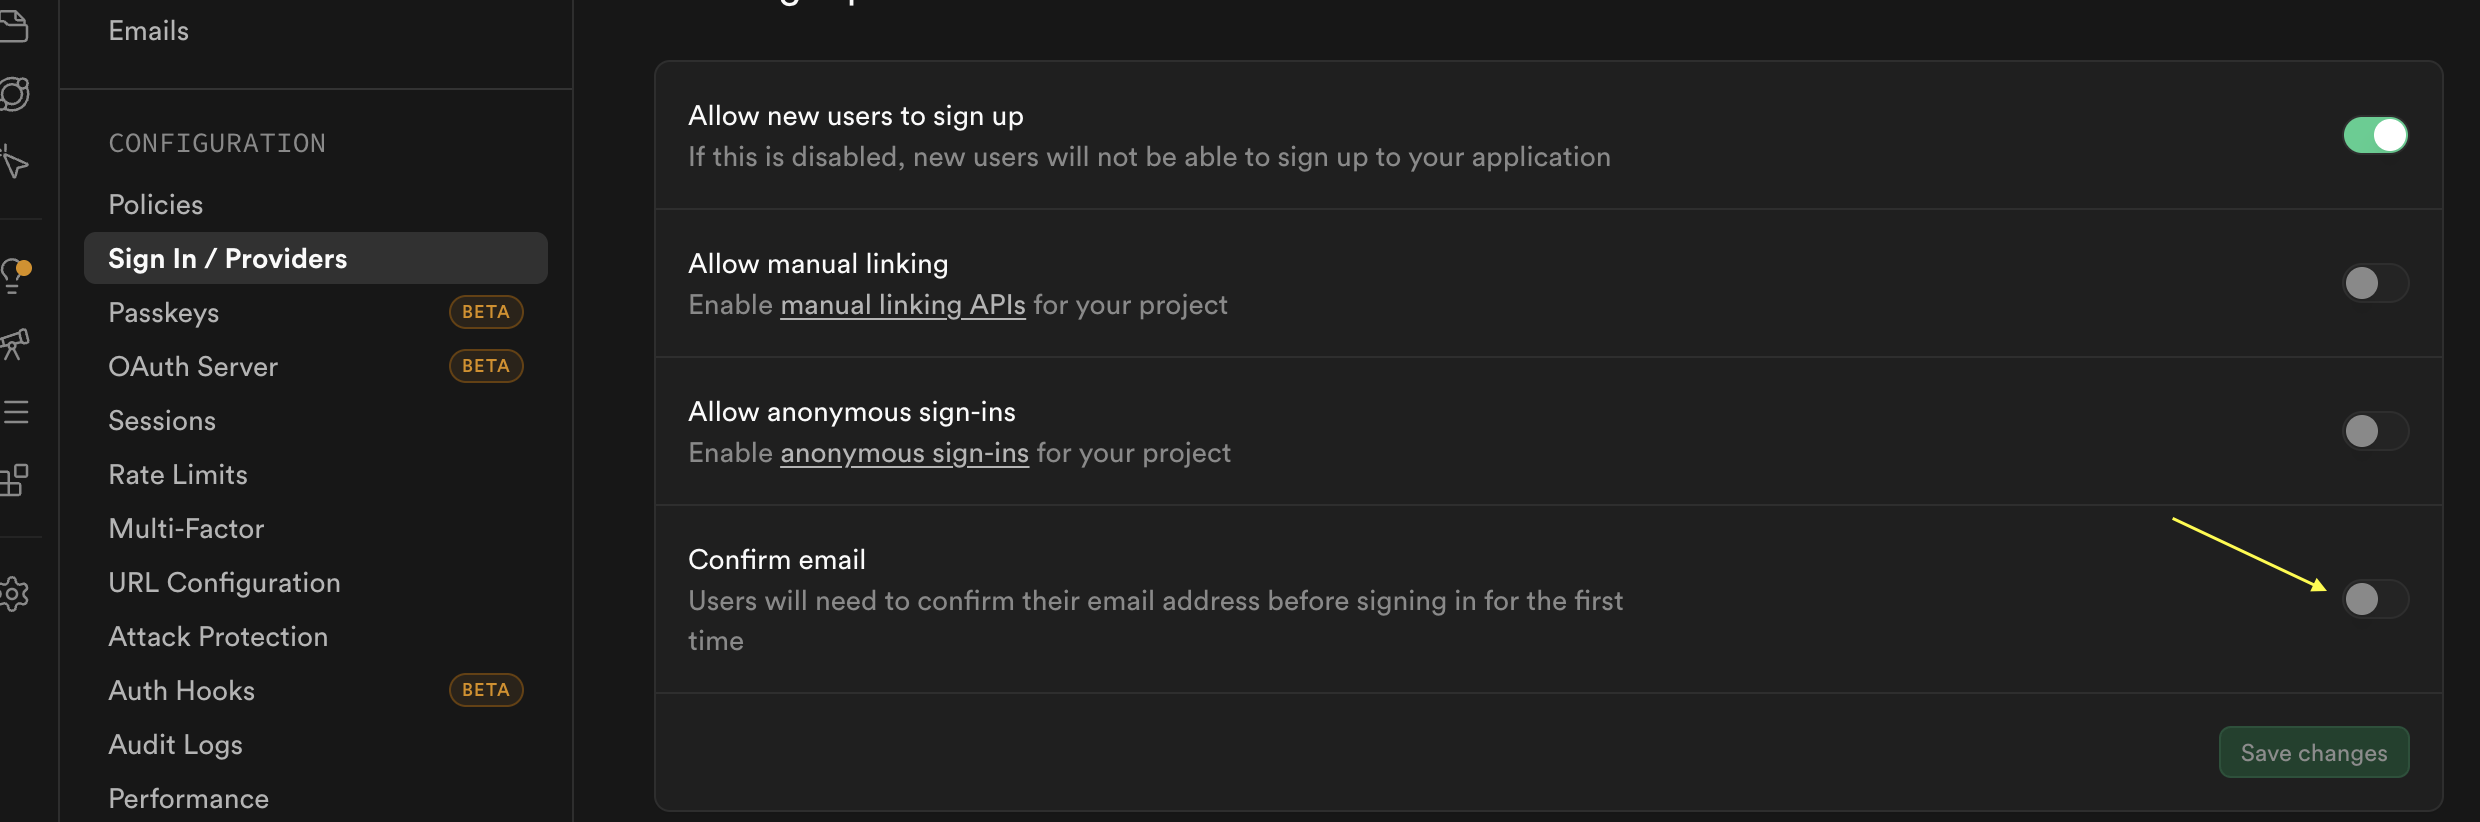
Note: You can enable "Confirm email" later. We disable it because the free tier only allows a limited number of email confirmations.
3.4 Run Database Migrations
- Open the file
drizzle/full-migration.sqlfromsmart-proposal-generator. - Copy all contents into the Supabase SQL Editor (left sidebar):
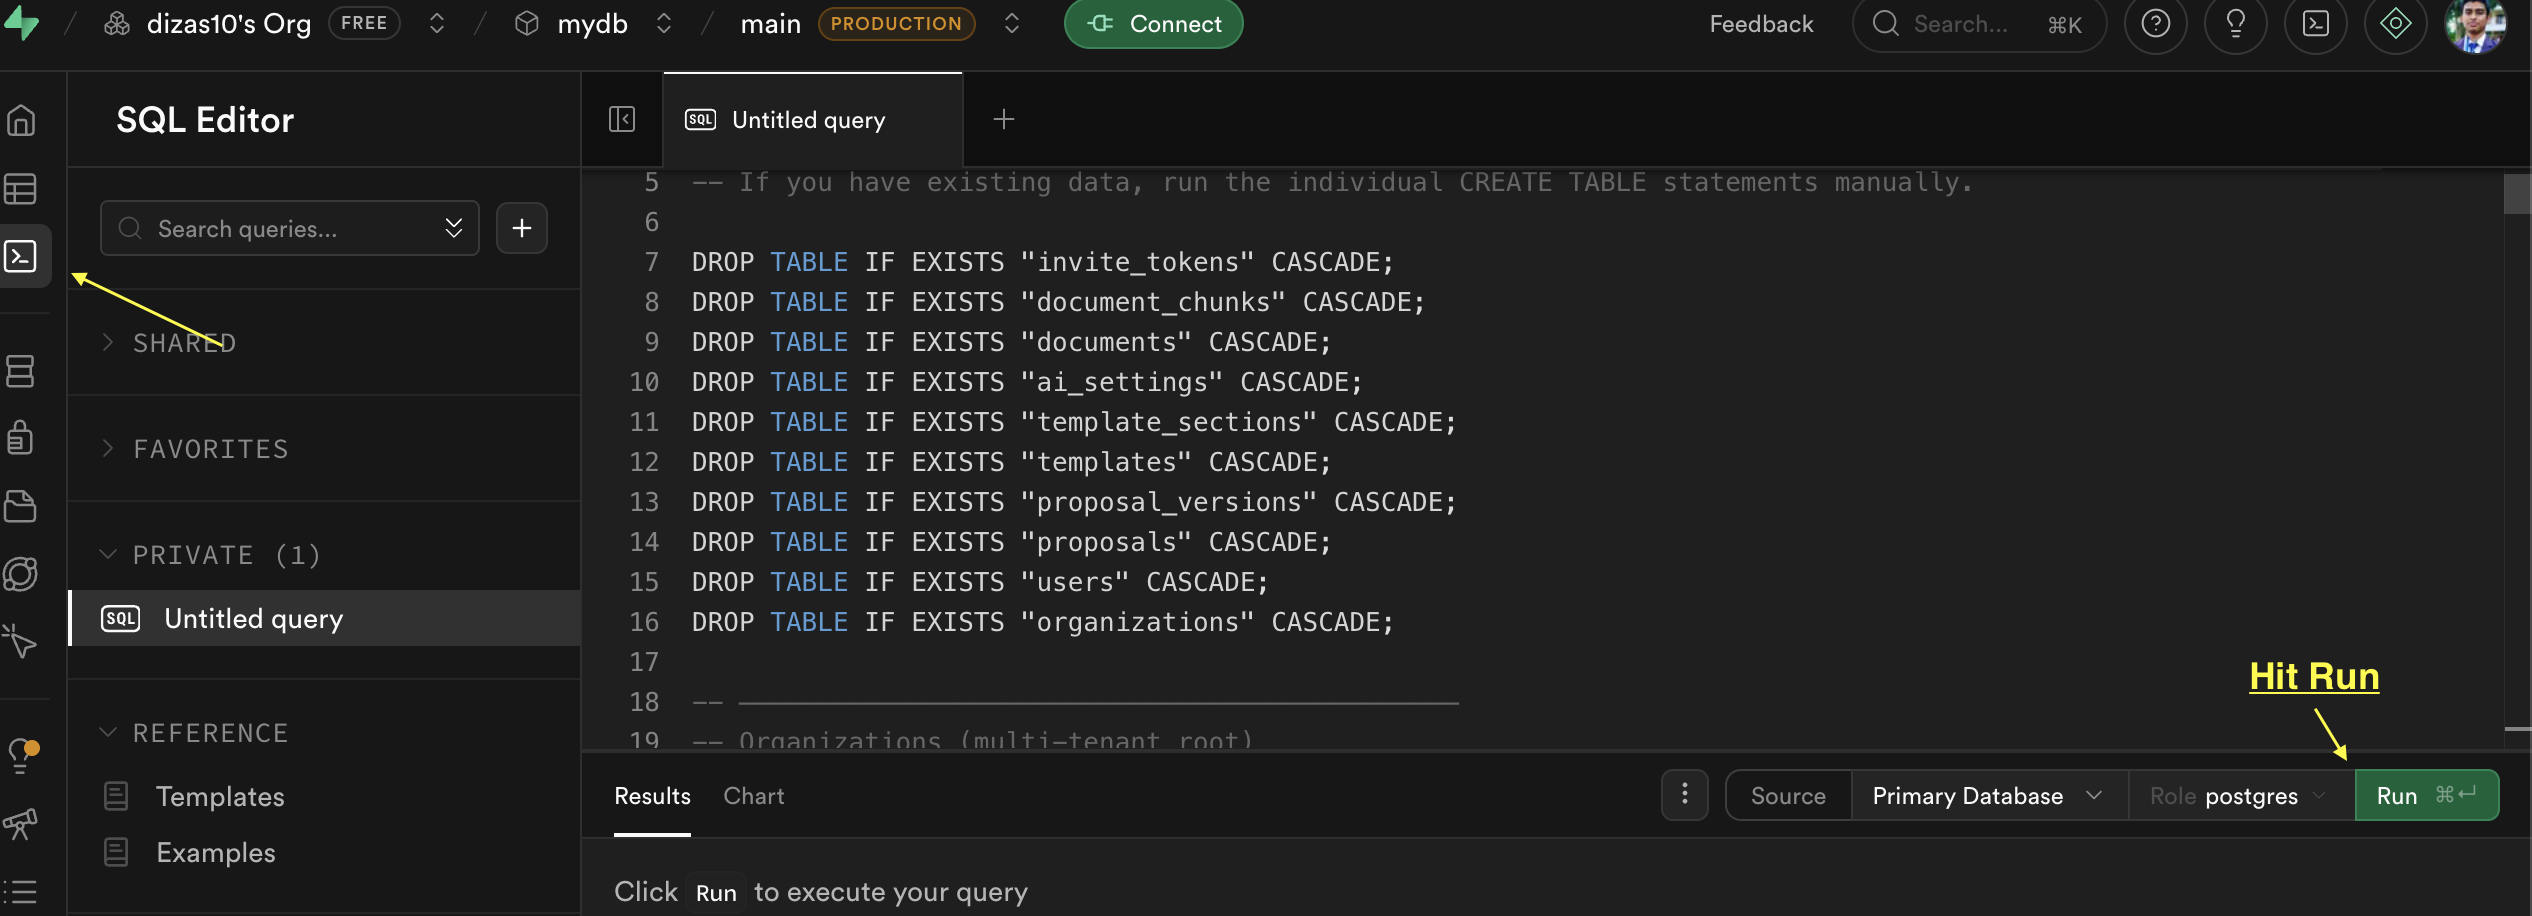
- Click "Run".
3.5 Create Storage Bucket for Logos
The app uses Supabase Storage to store organization logos. You must create this bucket manually in the Supabase Dashboard:
- Go to your Supabase Project → Storage (in the left sidebar)
- Click "New bucket"
- Fill in:
- Name:
logos - Public bucket: Toggle ON (so logos are publicly accessible)
- File size limit:
5 MB(matches the app's validation) - Allowed MIME types:
image/png, image/jpeg, image/svg+xml
- Name:
- Click "Create bucket"
Important: The bucket name must be exactlylogos(lowercase). The app references this bucket name inlib/actions/branding.actions.ts.
3.6 Apply Storage RLS Policies
After creating the bucket, run this SQL in Supabase SQL Editor to allow public access to logos and authenticated users to upload/update/delete:
-- Allow public SELECT access to logos bucket
CREATE POLICY "Public Access to Logos"
ON storage.objects
FOR SELECT
USING (bucket_id = 'logos');

-- Allow authenticated users to upload/update/delete
CREATE POLICY "Authenticated Users Can Upload Logos"
ON storage.objects
FOR INSERT
TO authenticated
WITH CHECK (bucket_id = 'logos');

CREATE POLICY "Authenticated Users Can Update Logos"
ON storage.objects
FOR UPDATE
TO authenticated
USING (bucket_id = 'logos');

CREATE POLICY "Authenticated Users Can Delete Logos"
ON storage.objects
FOR DELETE
TO authenticated
USING (bucket_id = 'logos');
Note: This SQL is also available at drizzle/storage-policies.sql in your project.
3.7 Enable pgvector
Run this in the Supabase SQL Editor (clear previous):
CREATE EXTENSION IF NOT EXISTS vector;4. Deploy to Netlify
4.1 Connect Netlify to GitHub
- Log in to netlify.com.
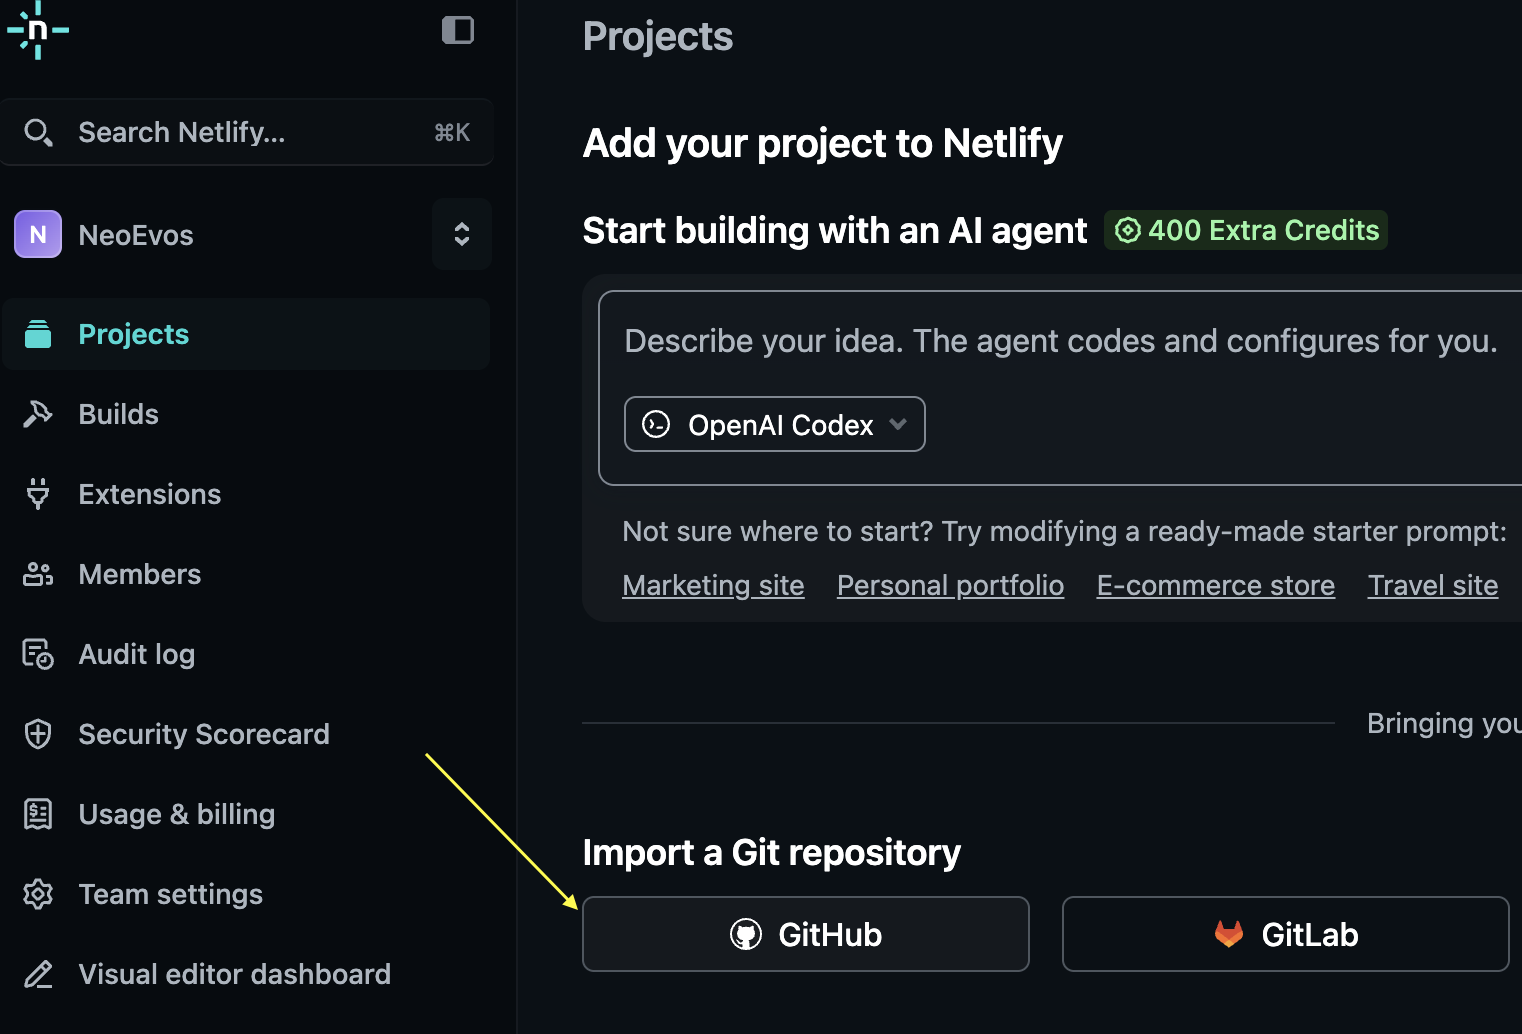
- Click "Add new site".
- Click "GitHub" and authorize Netlify.
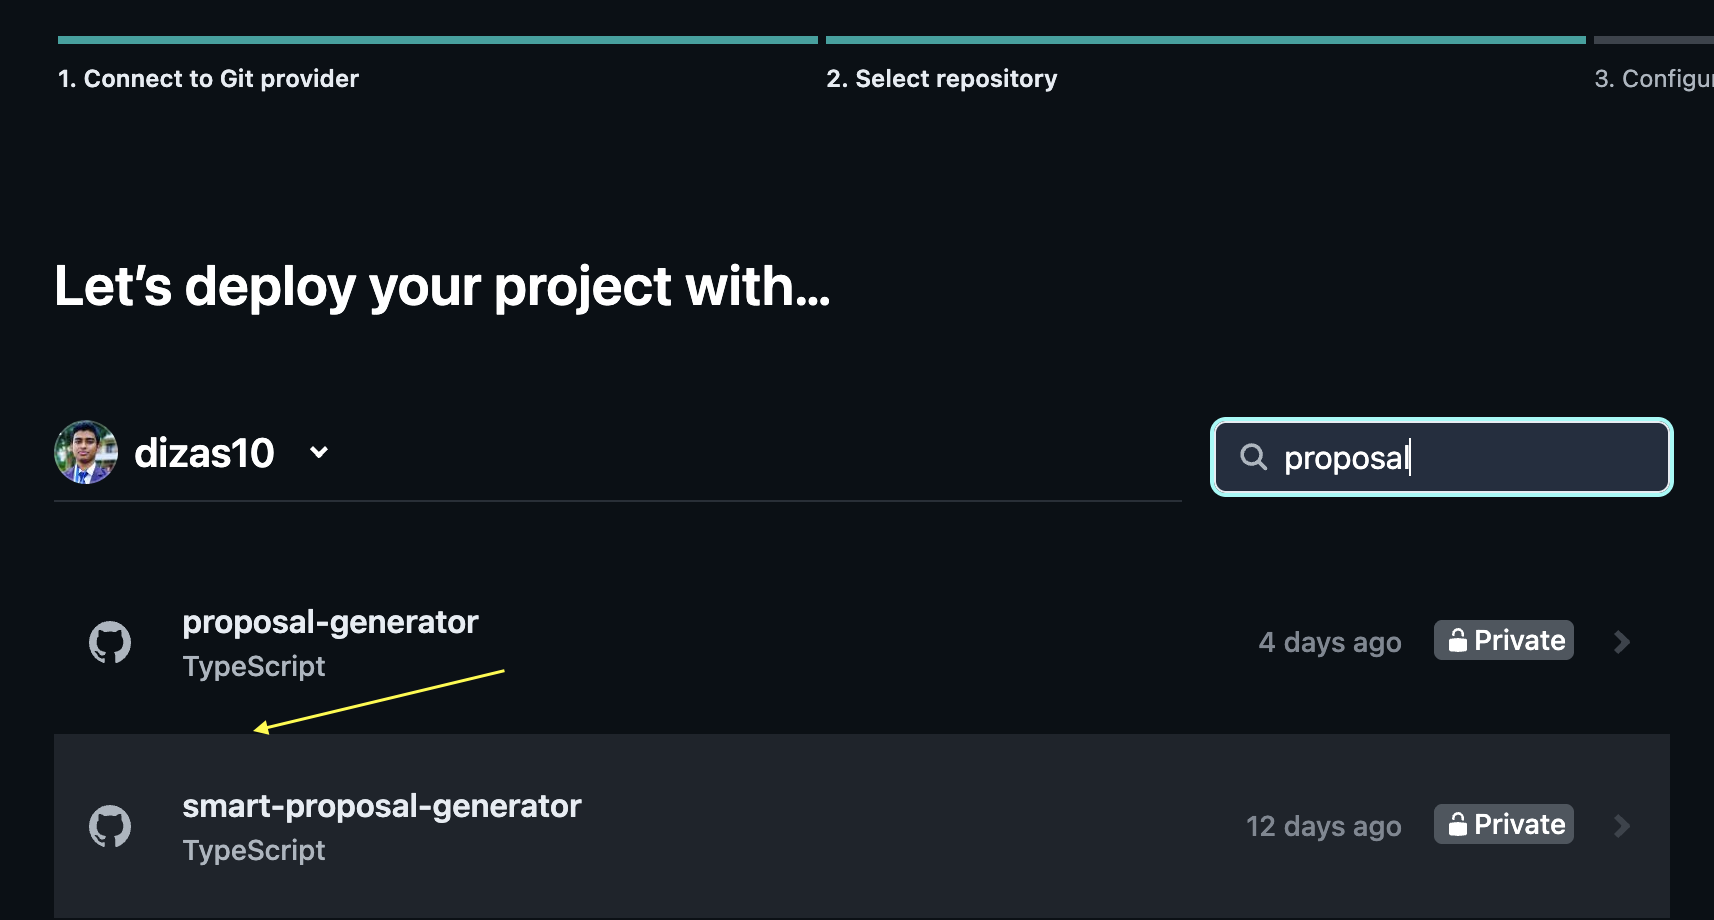
- Search for your repository and select it.
4.2 Configure Build Settings
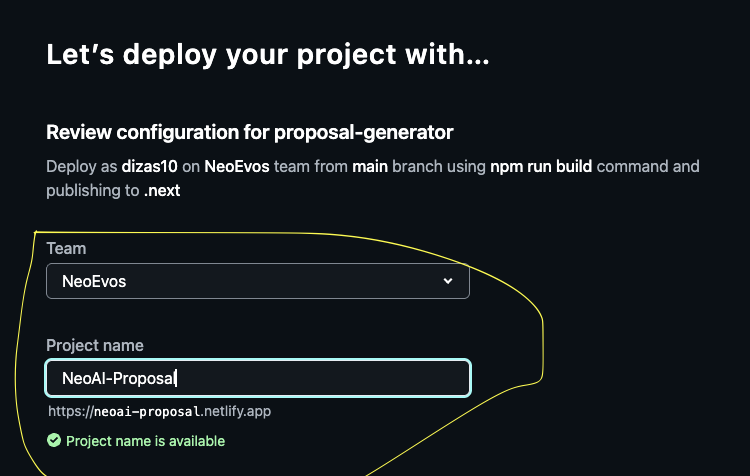
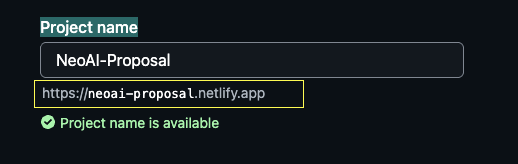
- Pick a project name that is available:
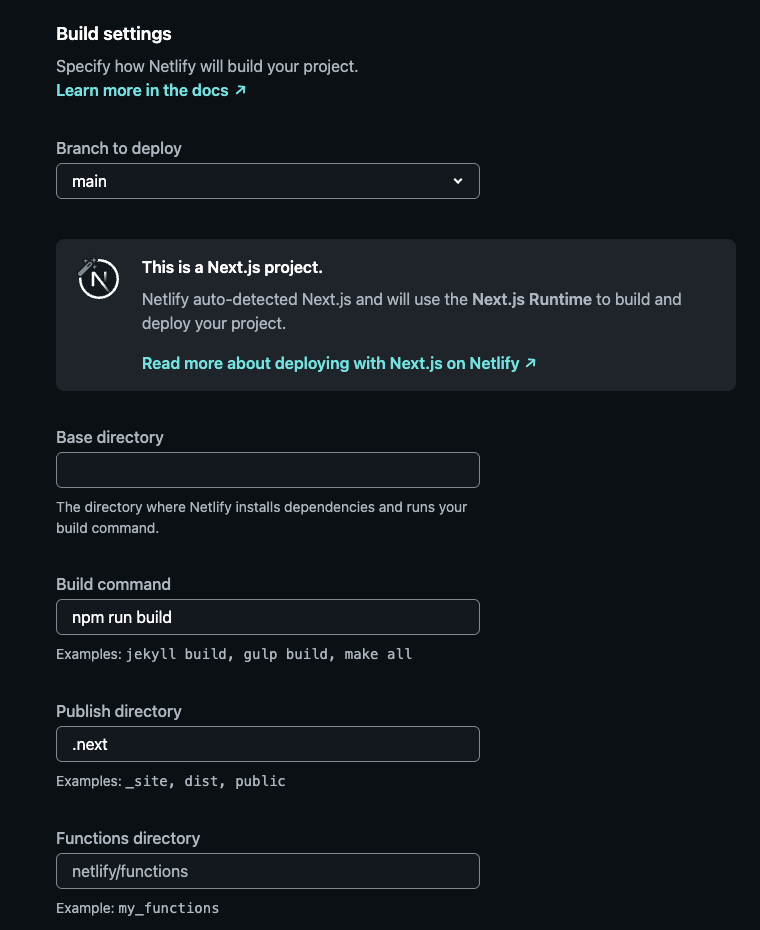
- Keep Build Settings as they are:
4.3 Add Environment Variables
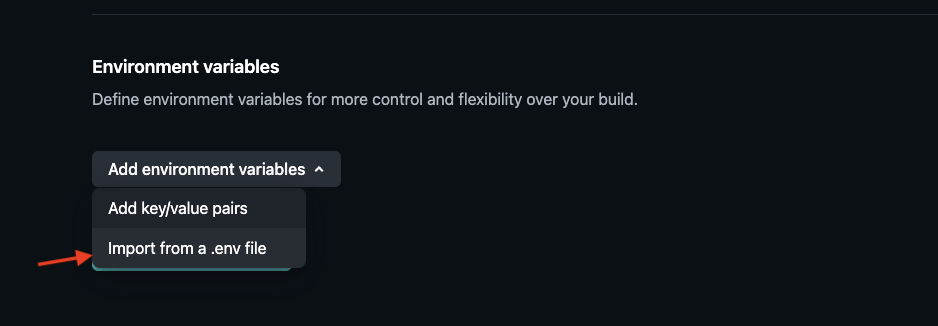
Click "Environment variables":
Copy all variables from .env.example and paste them there:
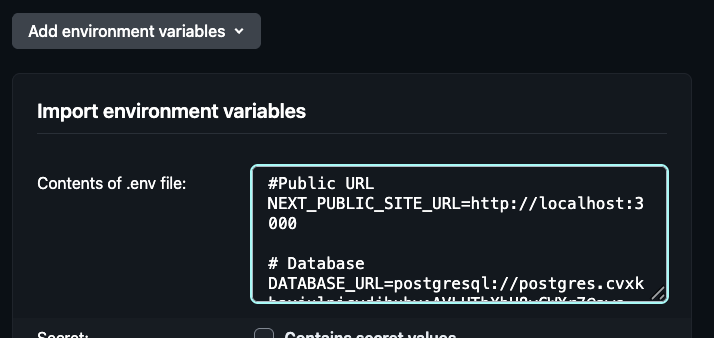
Now, scroll up to the Project name field and find the site URL. Place it under NEXT_PUBLIC_SITE_URL:
Click Deploy.
Security tip: Netlify encrypts these values. Never commit them to Git.
4.4 Deploy
Click "Deploy". Netlify will install dependencies, build the app, and deploy it to a URL like https://random-words-123456.netlify.app.
The first build takes 2-5 minutes. This is normal.
4.5 Update Supabase Redirect URLs
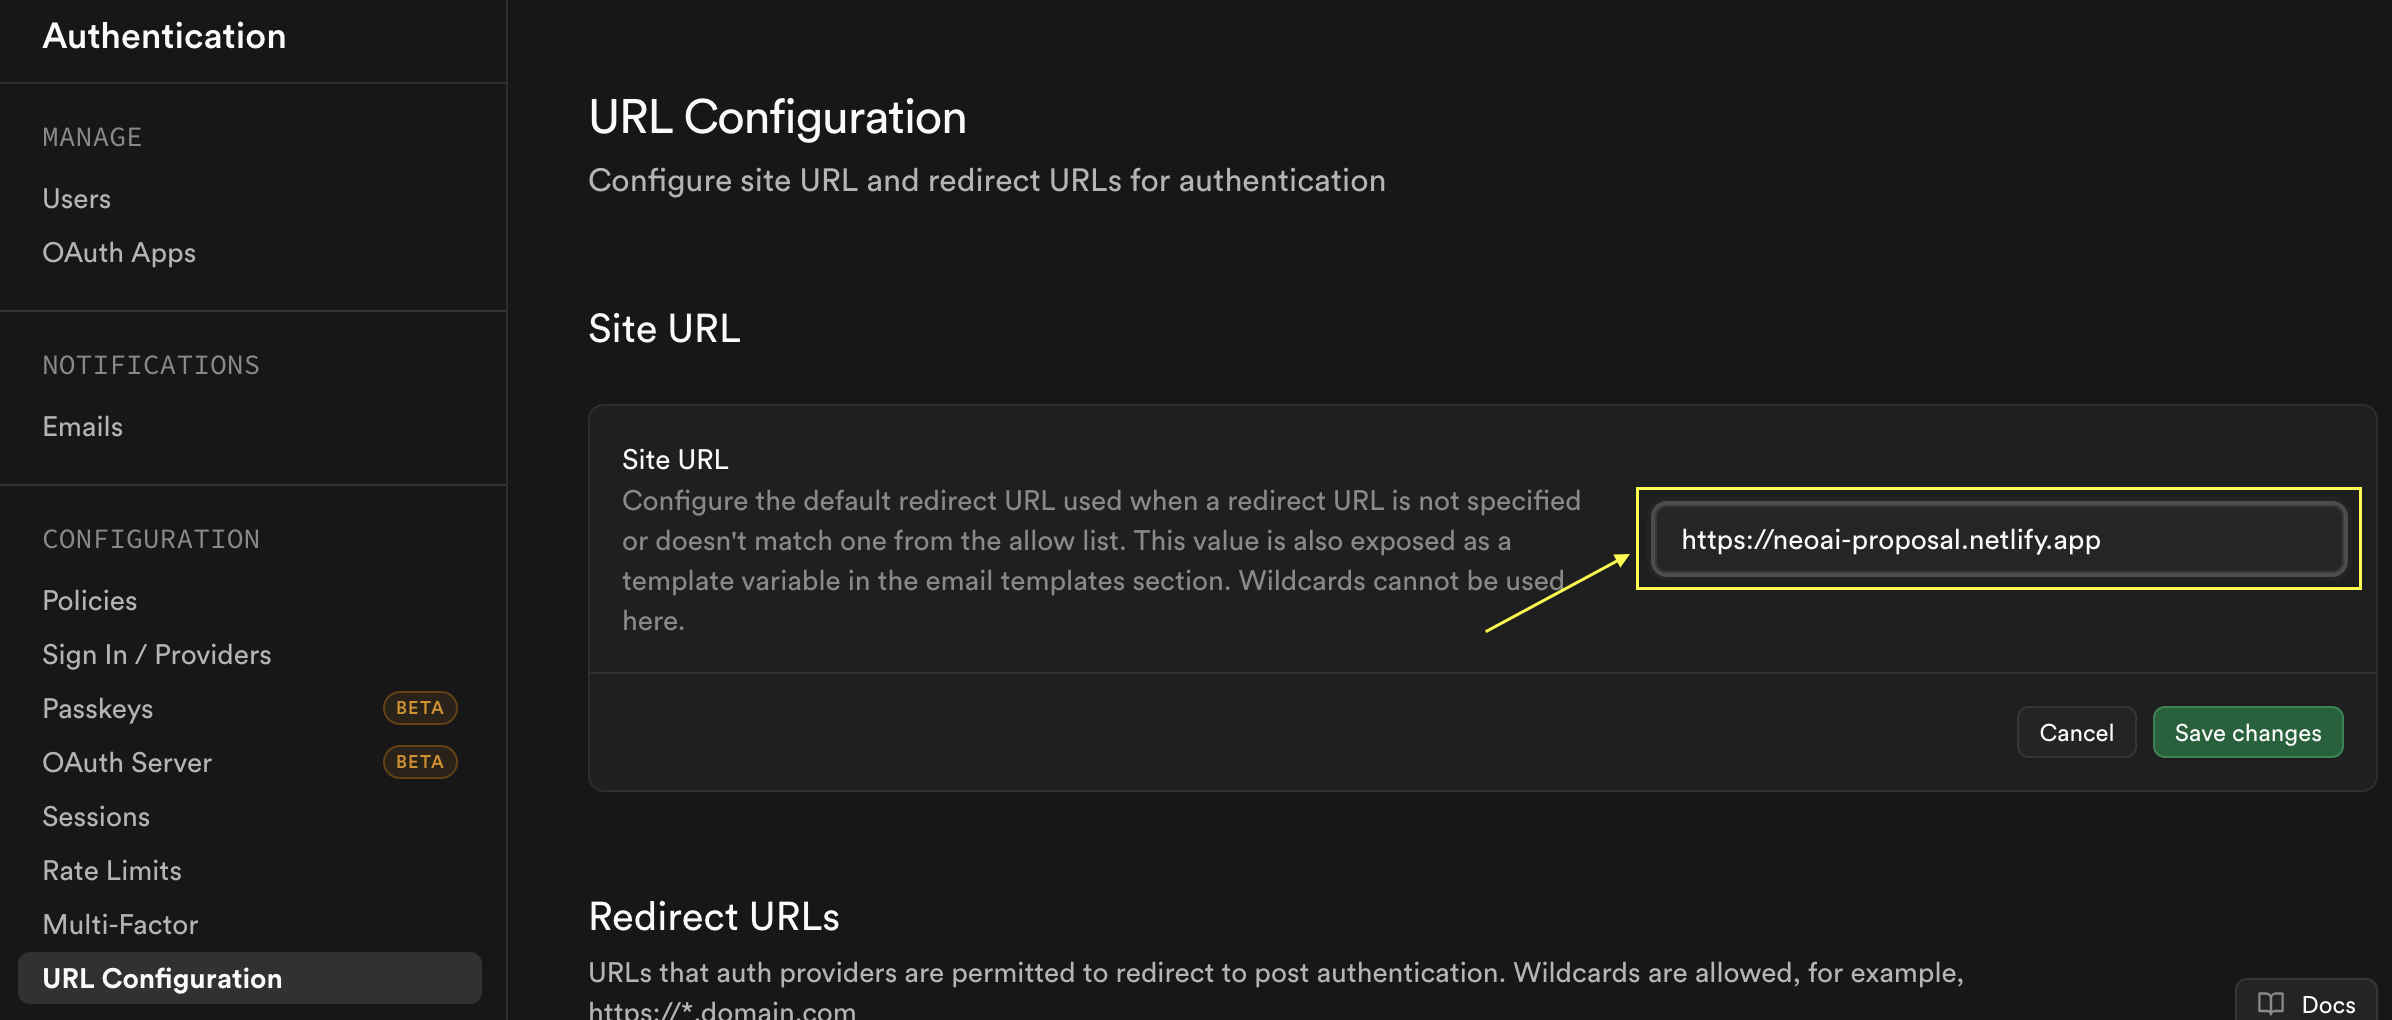
Once your site is live, copy the Netlify URL. Go back to Supabase → Authentication → URL Configuration and update Site URL to your Netlify URL.
4.6 Connect a Custom Domain (Optional)
- In Netlify, go to Site settings → Domain management.
- Click "Add custom domain" and enter your domain (e.g.
proposals.your-agency.com). - Follow Netlify DNS instructions.
- Netlify provisions a free SSL certificate automatically.
5. Post-Deployment Checks
Run through this checklist to make sure everything works:
- ✅ Site Loads — Visit your Netlify URL. You should see the Sign In page.
- ✅ Sign Up Works — Click "Sign Up" and create an account. You should receive a confirmation email (if SMTP is configured).
- ✅ Sign In Works — Sign in with your new account. You should land on the Dashboard.
- ✅ Create an Organization — You will be prompted to create an organization (e.g. "My Agency"). This is required for data isolation.
- ✅ AI Generation Works — Go to Proposals → New Proposal. Select an AI provider and generate a test proposal.
- ✅ Navigation Works — Navigate through Proposals, Templates, Knowledge Base, and Settings. No error pages should appear.
- ✅ Custom Domain (if set) — Visit your custom domain. It should load with a valid SSL certificate.
6. Troubleshooting
Build Fails on Netlify
- Check build logs in Netlify (Deploy → Deploy log).
- Common fixes:
- Make sure Base directory is set to
smart-proposal-generator. - Ensure all environment variables are added.
- Check that Node.js version is set to 18+ (Site settings → Build & deploy → Environment).
- Make sure Base directory is set to
Database Connection Error
- Verify your
DATABASE_URLin Netlify environment variables. - Make sure you replaced "PASSWORD" with the actual database password.
- Check Supabase → Database → Connection status.
Sign In / Sign Up Not Working
- Check Supabase → Authentication → Providers — is Email enabled?
- Check Supabase → Authentication → URL Configuration — does Site URL match your Netlify URL?
- Check browser developer console (F12 → Console) for errors.
AI Provider Returns Errors
- Verify your API key in Netlify environment variables.
- Check if the provider service is operational.
- Try a different provider (e.g. switch from OpenAI to Groq).
404 on Page Refresh
- Trigger a new deploy (Netlify → Deploy → Trigger deploy → Clear cache and deploy).
- Next.js client-side navigation should work automatically with correct build settings.
Need Help?
- Documentation: Check the other guides in the
docs/folder. - Support: Email support@neoai.dev
- GitHub Issues: Open an issue on your GitHub repository.
Thank you for choosing Neo AI. We built this tool to help you win more proposals. 🚀